Cage nuts are an essential component of many industrial applications. They are used in conjunction with screws, bolts, and washers to securely fasten equipment and panels to frames and other structures. They are widely used in the telecommunications, transportation, and electronics industries. As simple as they may seem, installing cage nuts requires some tricks and techniques to ensure maximum security and ease of installation. In this article, we will give you some tips that will help you install cage nuts efficiently and effectively.
What is Cage Nuts?
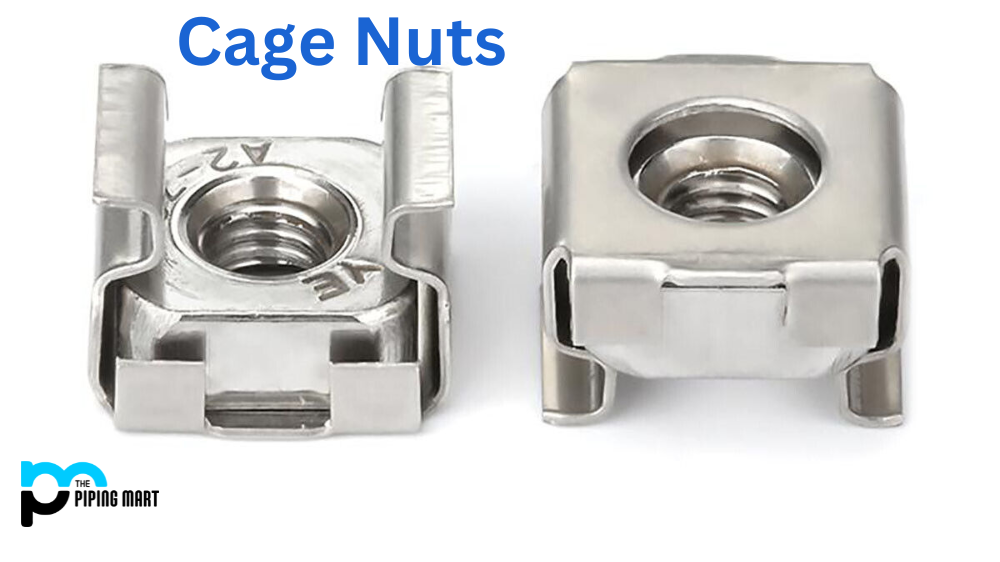
‘Cage nuts’ may sound like an unusual term to those unfamiliar with industrial equipment, but these small metal components play a crucial role in ensuring the stability and security of equipment. Cage nuts are specialized fasteners that attach hardware such as servers or shelves onto standard racks or enclosures.
The name ‘cage nut’ comes from its unique design, which resembles a cage with wings that extend outwards. These wings allow the nut to be easily inserted into square holes on the rack and then rotated 90 degrees to lock it securely. This innovative design eliminates the need for additional tools such as screws or bolts, making installation quick and effortless.
But what sets cage nuts apart from other types of fasteners is their ability to accommodate different thread sizes without changing the actual size of the nut itself. This is made possible by spring-like fingers within the cage that compress as pressure is applied from above, gripping tightly onto whatever hardware is attached.
One might wonder why this seemingly intricate attachment method is necessary when simpler options exist. The answer lies in their superior stability and strength. Unlike traditional screws or bolts that can become loose over time due to vibrations, cage nuts provide a secure hold that remains intact even under extreme conditions.
In addition to their mechanical advantages, cage nuts also offer practical benefits for equipment maintenance and upgrades. With traditional methods, replacing hardware often requires removing multiple screws or bolts before being able to detach the component completely. In contrast, you can easily remove any hardware without disrupting neighboring devices with just a few turns of a screwdriver or pliers on one wing of a cage nut.
Choose the Right Cage Nut
The first step in correctly installing cage nuts is choosing the right type and size for your requirements. Cage nuts come in different thread sizes, spacing, and materials, so selecting the appropriate nut for the job is essential. If you need help deciding which cage nut to choose, consult the equipment manual or ask a professional for help.
Use the Right Tools
Installing cage nuts requires some tools that you must have at your disposal. Some of the critical tools include a Phillips or flathead screwdriver, pliers, a hammer, and a cage nut insertion tool for faster and more secure installation. Alternatively, you can use a socket wrench to install the nut. Regardless of the tools you use, ensure they are in good condition and clean to avoid damaging the equipment or the nut.
Choose the Right Installation Method
Different ways to install cage nuts depend on the equipment and the space available. The most common installation methods include cage nut insertion, clip-on, and slide-on. In the cage nut insertion method, you insert the nut into the equipment’s mounting hole before tightening the screw. In the clip-on method, you attach the cage nut to the mounting hole by pressing the clips until they snap. The slide-on method involves sliding the cage nut onto a rail or other support before fastening it with screws or bolts. Choose the method that best suits your needs and skills.
Apply the Right Amount of Torque
Applying the right amount of torque to the nut’s screw is crucial for tight and secure fastening. Over-tightening or under-tightening the nut can cause damage to the equipment, the nut, or both. Follow the manufacturer’s recommendations or refer to a torque chart to know the appropriate torque values for your type and size of the cage nut. Use a torque wrench to ensure you apply the right force, and check the tightness periodically to avoid loosening or slipping.
Inspect the Installed Cage Nut
After installing the cage nut:
- Inspect it to ensure that it is tight, secure, and straight.
- Check that the nut is not slipping or moving in any direction and that the screw is not excessively protruding from the nut or the equipment.
- If you notice any irregularities, adjust or reinstall the nut as needed.
Regular inspection of the cage nuts and other fasteners is essential to maintain the equipment’s safety and reliability and avoid accidents.
Conclusion:
Installing cage nuts requires attention to detail, the right tools, and some practice. By following the tips we have given you in this article, you can easily and efficiently install cage nuts that will provide a secure and reliable fastening for your equipment. Always read the manufacturer’s instructions and consult a professional if you have any doubts or questions. Inspect your cage nuts and other fasteners regularly to ensure longevity and safety.
Sakshee is a talented blogger, with a particular focus on the Business and Metal Industry. She is passionate about sharing her insights on various metal products and helping professionals to make a better decisions.