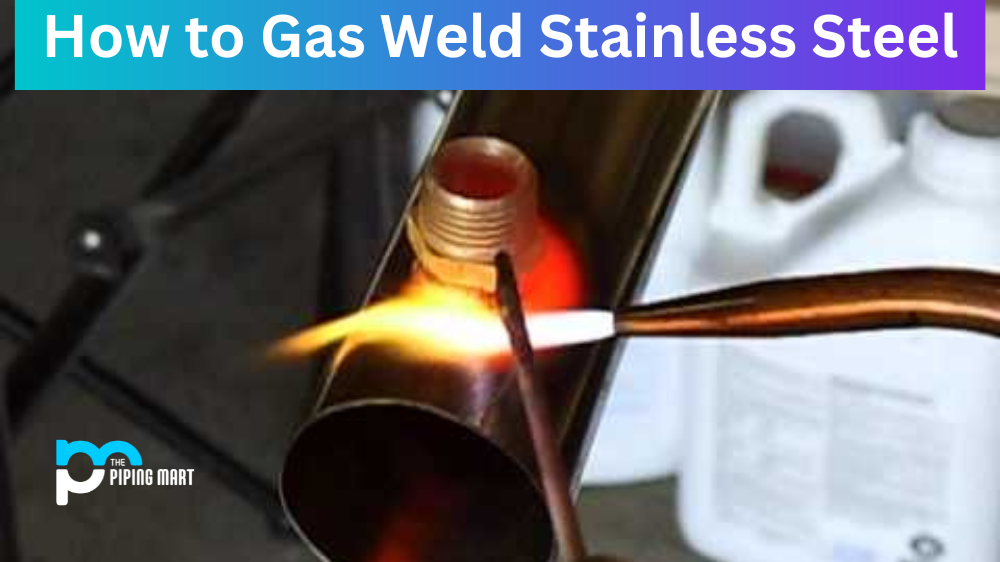
Gas welding is a great way to join stainless steel components, and it’s relatively easy to do as long as you have the right equipment and know-how. In this blog post, we’ll discuss the basics of gas welding stainless steel and provide step-by-step instructions for getting it done.
Basics of Gas Welding Stainless Steel
Gas welding is a process that uses a heat source to melt two pieces of metal together before they are joined by a filler material. The heat source is usually an oxyacetylene torch, which combines oxygen and acetylene gas to produce a hot flame. This flame is used to heat up the edges of the metal components so that they can be joined together using a filler material such as flux or wire.
When gas welding stainless steel, it’s essential to take extra care because the high temperatures can cause warping or other issues if not handled properly. It’s also essential to use the correct type of weld rod for the application—ideally, one made from 304 stainless steel that has been designed specifically for gas welding.
Step-by-Step Guide on How To Gas Weld Stainless Steel
Make sure your work area is clean and free of debris. Wipe down all surfaces with rubbing alcohol before starting your project.
- Prepare your materials by cutting them into shapes and removing any burrs or sharp edges that may interfere with the welding process. Use a grinder if necessary.
- Set up your oxyacetylene torch according to manufacturer instructions and check all connections for leaks before lighting the torch. Once everything has been tested, light the torch using an igniter or sparker as your manual directs. This should create an intense blue flame when viewed through goggles (never look at an open flame without proper eye protection).
- Position the tip of your torch at an angle between 45° – 60° and adjust it until you have created a cone shape in which all four corners meet each other around 18″ away from the surface being welded (this will depend on how much preheat you need).
- Don’t forget to keep safety in mind – always wear gloves when handling hot objects!
- Begin moving along one edge at about 2″ per second while controlling your preheat temperature with your torch angle and speed – don’t go too fast or slow here! Once you reach the end of one side, move onto the other side while maintaining preheat temperature throughout both sides (you want them both equally heated).
- Continue moving back and forth until you reach what’s known as “the puddle zone,” which is typically around 1/2 – 3/4″ away from where you began welding – this means that both pieces should now be melted together enough so that when you stop moving, they stay connected without additional filler material needed!
- Apply filler material in small amounts only after stopping movement along both sides – this will help ensure that everything melts evenly throughout each piece being welded together instead of pooling into one spot (which could lead to cracking or other issues later on). Be careful not to overfill either side; only add enough filler material so that there are no gaps between pieces once melted down completely!
- Let cool completely before handling further – typically, this takes anywhere between 15 minutes up to several hours depending on thickness/materials used, etc., but make sure everything has cooled off fully before attempting any further steps with it (no matter how impatient you may feel)!
- Finally, inspect all seams carefully for any signs of warping or cracking due to uneven heating; if found, repeat steps 4 – 8 until satisfied with the results!
- Enjoy your new stainless steel weld job!
Conclusion:
Gas welding stainless steel can be tricky because its higher melting point requires extra care during heating processes than regular carbon steel—but don’t let that deter you from trying it out! With some practice and patience, anyone can become proficient at gas welding stainless steel projects successfully with beautiful results every time! Follow our handy step-by-step guide above for the best results every time you start up your oxyacetylene torch!
A passionate metal industry expert and blogger. With over 5 years of experience in the field, Palak brings a wealth of knowledge and insight to her writing. Whether discussing the latest trends in the metal industry or sharing tips, she is dedicated to helping others succeed in the metal industry.